导入流程示例
In order to show how SyNAP toolkit can be used in practice, we show here the use-case of converting a face-detection model. Even if we present a specific use-case, the same techniques and ideas are valid in general.
备注
For detailed information and description on the commands and options used in this document please refer to the SyNAP user manual: SyNAP.pdf.
使用案例
We would like to perform face-detection on images. Instead of developing our own model, we search a bit online and we see that the YOLOv5-face model seems a good fit. Of course we want to have a good accuracy and we want to run our model at 30 FPS on our VS680 EVK board, so overall inference time must be less than 33ms.
初步评估
We find a pre-trained, pre-quantized yolov5s_face_640x640.tflite so we want to try it to have an
idea of the level of performance we can expect.
We compile it using SyNAP toolkit, download it to the board and measure inference time using the
synap_cli application.
Since our tflite model is already prequantized, it can be converted directly without any additional
complication.
$ synap convert --model yolov5s_face_640x640.tflite --target VS680 --out-dir compiled
$ ls compiled
model.synap  model_info.txt

$ adb shell mkdir /data/local/tmp/test
$ adb push compiled/model.synap /data/local/tmp/test
$ adb shell "cd /data/local/tmp/test && synap_cli -r 5 random"
    ....
    Predict #0: 43.58 ms
    Predict #1: 43.48 ms
    Predict #2: 44.12 ms
    Predict #3: 42.07 ms
    Predict #4: 43.24 ms

    Inference timings (ms):  load: 145.11  init: 28.47  min: 42.07  median: 43.47  max: 44.12  stddev: 0.68  mean: 43.29
We notice that inference time is about 43ms, above our desired target but still reasonable, so it makes sense to work on this to optimize things. The first thing we check is if the input size is correct for our application.
使用适当的输入大小
In Neural Networks the size of the input plays often a major role in the resulting inference time, in particular when many convolution layers are involved, so it is always a good idea to check if the size and shape of the input is adequate for what we want to achieve. In our case the image comes from a camera with 4:3 aspect ratio. To fit it in a 640x640 network we have to add padding bands at the top and at the bottom. These added pixels will be fully processed by the network as the real pixels, but they actually contain nothing so this additional processing is just a waste of time. Ideally we need a network with the same aspect ratio of our input, that is 640x480 in our case. We might also consider a smaller input (e.g. 320x240) for some application but in our case we think that 640x480 is right.
We clone the PINTO model zoo from
https://github.com/PINTO0309/PINTO_model_zoo
we run the script
130_YOLOv5_Face/download.sh
and we use the model
130_YOLOv5_Face/saved_model_yolov5s_face_480x640/yolov5s_face_480x640.onnx.
We take the sample image from the board:
adb pull $MODELS/object_detection/face/sample/face_720p.jpg .
Before investing time and effort in compiling and optimizing a model it’s always a good idea to test the execution of the original model on a PC. This phase can be as simple as running the model on a couple of sample images and checking that the result matches our expectation, or as complex as putting in place a test bench to evaluate its accuray on multiple reference datasets. Most models that we can find open source are provided with some test code that can be used to execute them out of the box: this is often good enough for a preliminary assessment.
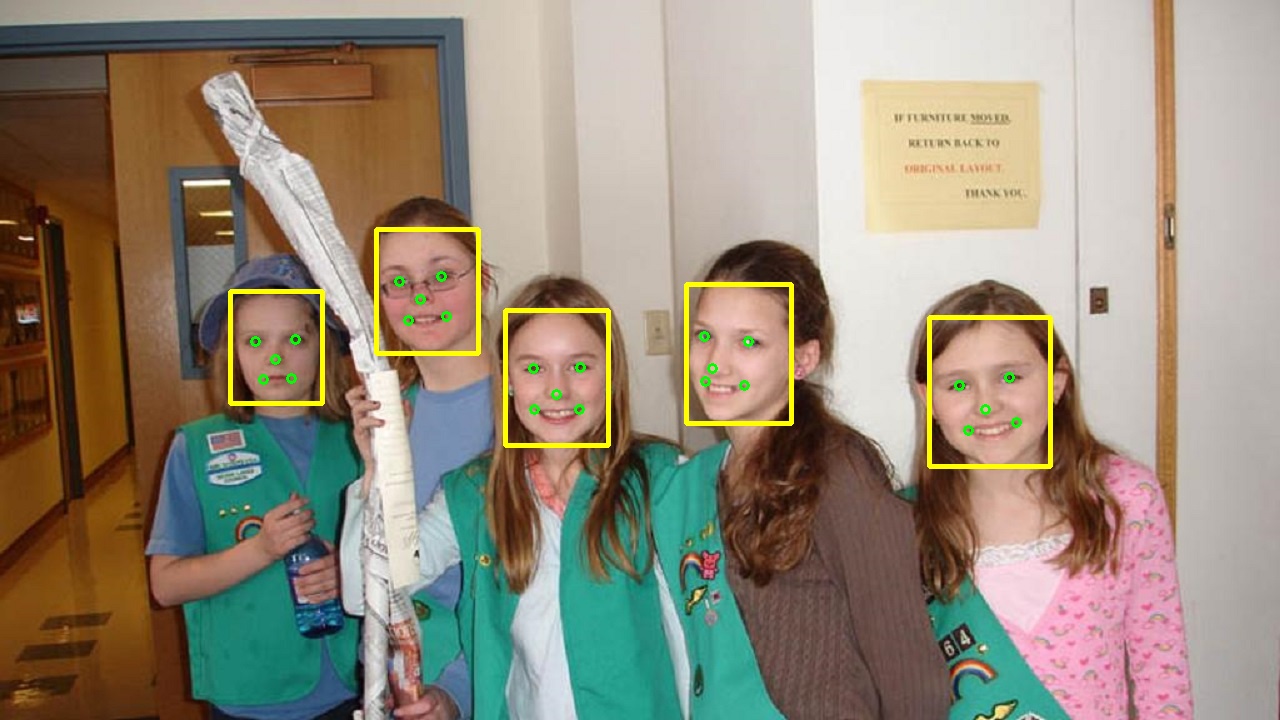
Detections from running the original model on a PC
The result seems good, so we can go on, compile the model and run it on the board as before:
$ synap convert --model yolov5s_face_480x640.onnx --target VS680 --out-dir compiled
$ adb push compiled/model.synap /data/local/tmp/test
$ adb shell "cd /data/local/tmp/test && synap_cli -r 5 random"
    ....
    Predict #0: 2240.05 ms
    Predict #1: 2228.61 ms
    Predict #2: 2363.15 ms
    Predict #3: 2272.57 ms
    Predict #4: 2241.46 ms

    Inference timings (ms):  load: 356.74  init: 73.25  min: 2228.60  median: 2241.45  max: 2363.14  stddev: 49.20  mean: 2269.16
Surprisingly inference time is now about 50 times slower than what we had with the previous model. We open the *onnx* model with Netron ( https://github.com/lutzroeder/netron ) and we notice that this is a floating point model. So the high inference time is not surprising at all, in order to run it efficiently on the NPU we have to quantize it.
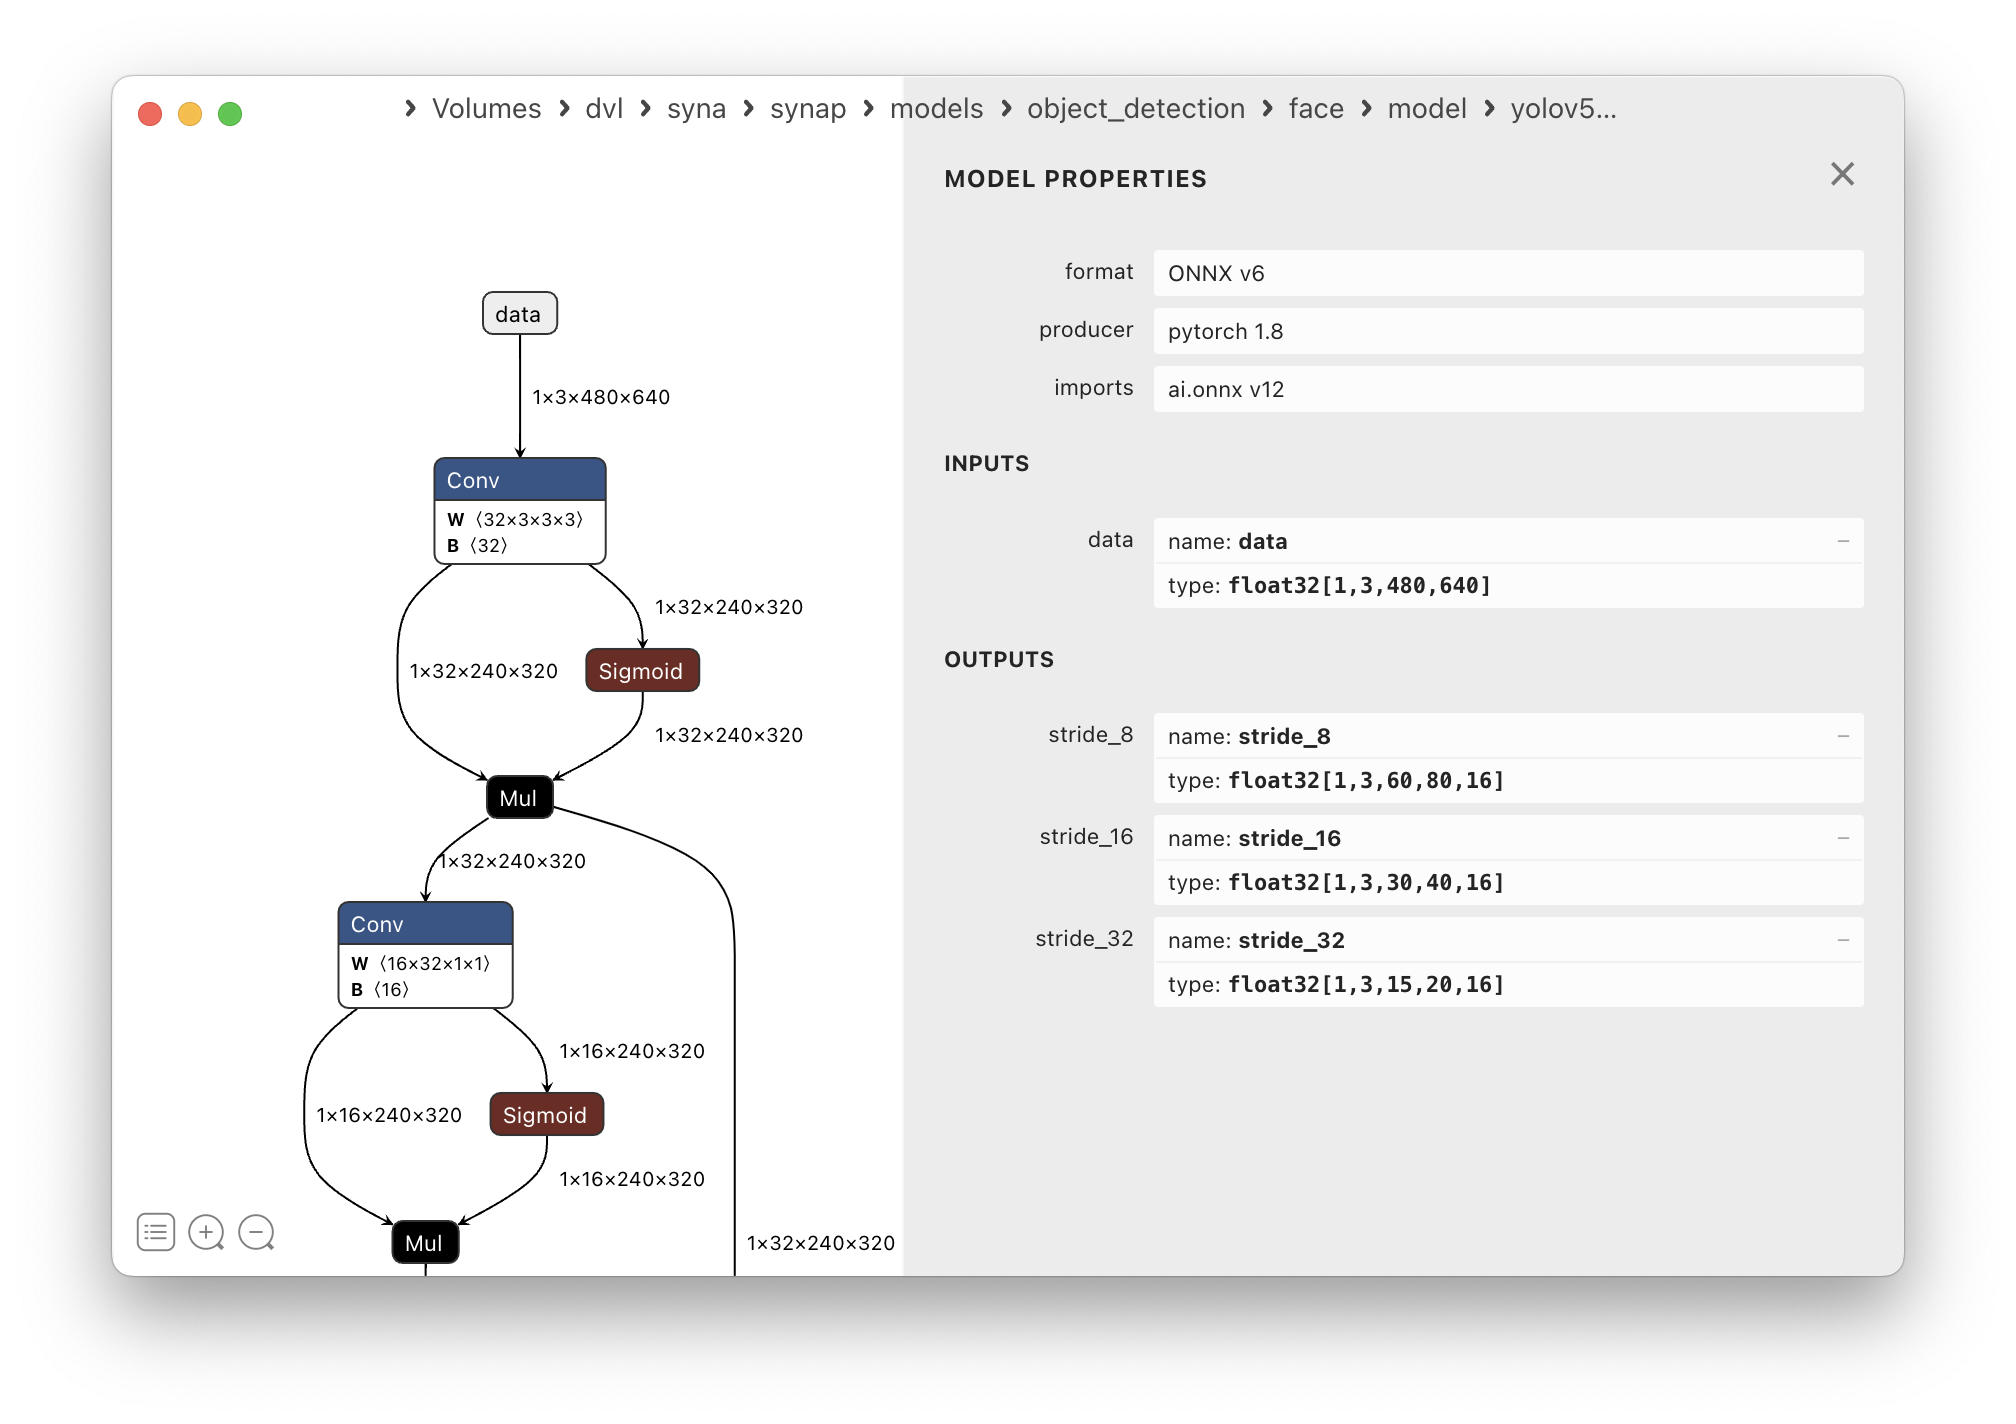
Floating point YOLOv5 model
重要
use a model with an appropriate input tensor size and aspect ratio for the intended application
重要
do an assessment of the original model on a PC before embarking in the quantization process. This will provide a reference against which to benchmark the quantized model
模型量化
Model quantization can be done during training (Quantization-Aware Training) in frameworks such as Tensorflow and PyTorch. This quantization technique is the one that can in principle provide the best results in term of accuracy of the generated model. In alternative the same frameworks also allow to perform quantization after a model has been trained (Post Training Quantization).
Quantized models can be imported directly with SyNAP. In our case we already have a trained floating point model in onnx format, so converting it back to a format suitable for quantization with one of these frameworks is cumbersome. The simplest way is to perform quantization when the model is compiled using the SyNAP toolkit.
Quantization requires running inference on a set of representative input files (quantization data set), so that it is possible to determine the expected data range for all the tensors in the network. From these data ranges the quantization parameters for each layer can be derived using suitable algorithms.
The list of files in the quantization data set has to be specified when the model is converted
using SyNAP toolkit. In order to avoid complicated command lines, the toolkit uses the approach of
having all the conversion options, including the qauantization dataset, in a single .yaml file
know as the conversion metafile which is specified when the model is converted:
inputs:
  - format: rgb
outputs:
  - dequantize: true
    format: yolov5 landmarks=5 anchors=[[],[],[],[4,5,8,10,13,16],[23,29,43,55,73,105],[146,217,231,300,335,433]]
  - dequantize: true
  - dequantize: true

quantization:
    data_type: uint8
    scheme: asymmetric_affine
    dataset:   # One entry for each input of the model
      - qdataset/*.jpg
The dequantize option is set to true for each output (the model we are using has 3 outputs) so that
the conversion to floating point is done using the NPU, this is much faster that performing the conversion in SW.
The output format specification is not required to perform the conversion,
but it will be embedded in the generated model metadata and will be used by SyNAP postprocessing
library to understand how to interpred the model output. This is required only for the first output.
The anchors depend on how the model has been trained, we took them directly from yolov5-face git:
https://github.com/deepcam-cn/yolov5-face/blob/master/models/yolov5s.yaml
The dataset specification can contain wildcard,
here we have resized some sample image using an external tool to 640x480 and put them in the
qdataset directory.
We convert and quantize the model:
$ synap convert --model yolov5s_face_480x640.onnx --meta yolo.yaml --target VS680 --out-dir compiled
Measure inference time:
$ adb shell "cd /data/local/tmp/test && synap_cli -r 5 random"
    ....
    Predict #0: 31.25 ms
    Predict #1: 28.75 ms
    Predict #2: 28.06 ms
    Predict #3: 28.35 ms
    Predict #4: 28.84 ms

    Inference timings (ms):  load: 135.78  init: 19.65  min: 28.05  median: 28.75  max: 31.25  stddev: 1.14  mean: 29.05
Now we run object detection using the synap_cli_od application:
$ adb push compiled/model.synap /data/local/tmp/test
$ adb shell "cd /data/local/tmp/test && synap_cli_od face_720p.jpg"
Loading network: model.synap
...
Input image: face_720p.jpg (w = 1280, h = 720, c = 3)
{
  "items": [],
  "success": true
}
Median inference time is now less than 29ms, an improvement of more than 30% over the previous model. Unfortunately the result is no detection at all. Something went wrong. After double checking everything we find two issues in what we did:
we didn’t specify preprocessing options for the input
when we converted the images in the quantization dataset to 640x480 we didn’t preserve the aspect ratio, so images which where for example square or 16:9 got distorted when we resized them to 640x480
The effect of 1 and 2 is that we didn’t use a representative quantization data set, so the model was not quantized correctly.
We fix point 1 by specifying in the conversion metafile the same processing options used during training
(we can normally find them in the sample inference code that comes with the model if they are not
specified explicitly in the model documentation).
We fix point 2 by replacing the content of our qdataset directory with the original images,
SyNAP toolkit will take care of resizing them correcly by adding bands if needed to avoid distortion.
Here our fixed metafile:
inputs:
  - means: [0, 0, 0]
    scale: 255
outputs:
  - dequantize: true
    format: yolov5 landmarks=5 anchors=[[],[],[],[4,5,8,10,13,16],[23,29,43,55,73,105],[146,217,231,300,335,433]]
  - dequantize: true
  - dequantize: true

quantization:
    data_type: uint8
    scheme: asymmetric_affine
    dataset:
      - qdataset/*.jpg
Execution now begins to provide some detections:
$ adb shell "cd /data/local/tmp/test && synap_cli_od face_720p.jpg"
Loading network: model.synap
...
Input image: face_720p.jpg (w = 1280, h = 720, c = 3)
{
    "items": [
      {
        "bounding_box": {
          "origin": {
            "x": 507,
            "y": 310
          },
          "size": {
            "x": 106,
            "y": 135
          }
        },
        "class_index": 0,
        "confidence": 0.8831787705421448,
        ...
In order to see the detection boxes on the image we can redirect the output of synap_cli_od to
the image_od tool provided in the toolkit. This will generate a new image with the bounding
boxes and landmarks:
adb shell "cd /data/local/tmp/test && synap_cli_od face_720p.jpg" | synap image_od -i face_720p.jpg -o face_720p_out.jpg
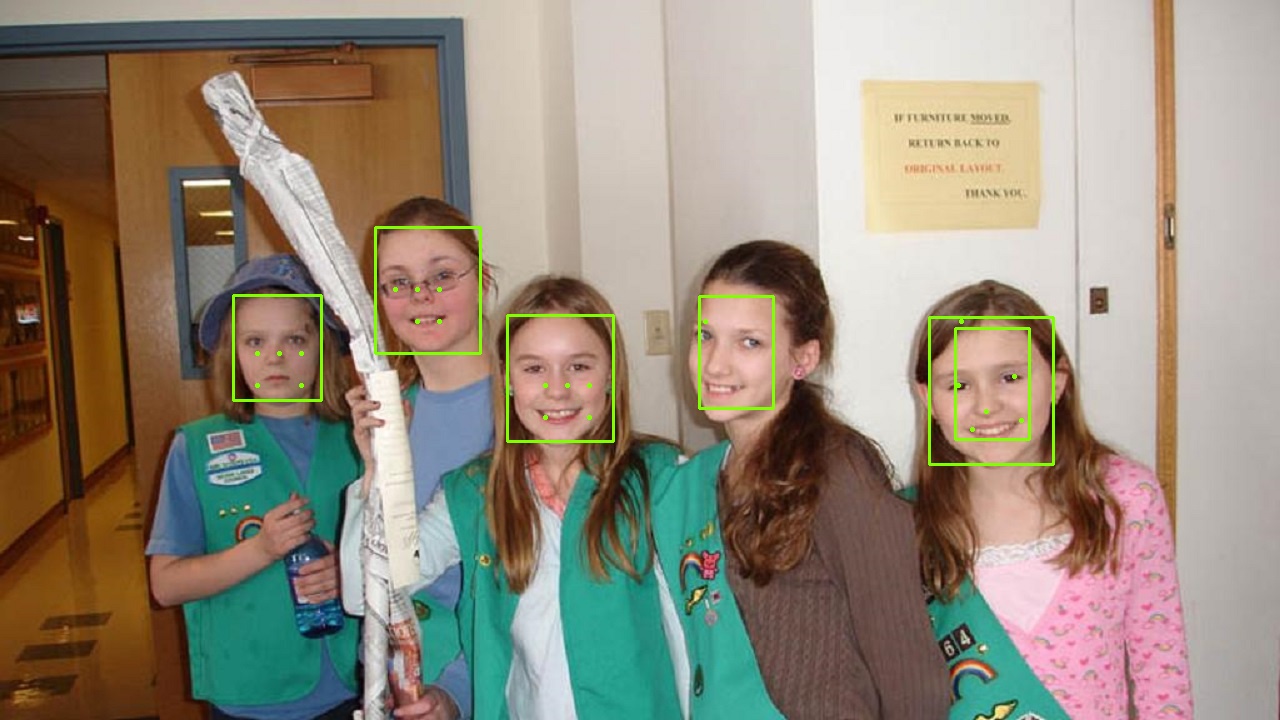
Detections from our quantized model (face_720p_out.jpg)
重要
specify the correct preprocessing options in the conversion metafile (mean and scale) be sure they are the same as those used during training and inference
重要
use representative undistorted images in the quantization dataset. This is important to ensure that the activations of all layers take the same distribution of values that will be found during inference
The quantized model now provides detections which are reasonable but far from good, in particular for the landmarks where we need a high precision in order to be useful. Before looking at how to improve the quantization let’s see how to optimize the model even more.
移除不必要的图层
If we look at the final layers in our model we can observe that the last two layers for each output are a Reshape and Transpose. While these layers are fully supported by the NPU, there is no real computation going on, the data is just being moved around in memory, and the NPU is not faster than the CPU in this task. Furthermore since we have to perform postprocessing anyway we can write our code to support the data format as it is before these layers, so no data movement is needed at all.
Removing these layers from the ONNX model itself is possible but requires editing the model using the ONNX API
which is not trivial. Things are even more complicated in the case of tflite or caffe models.
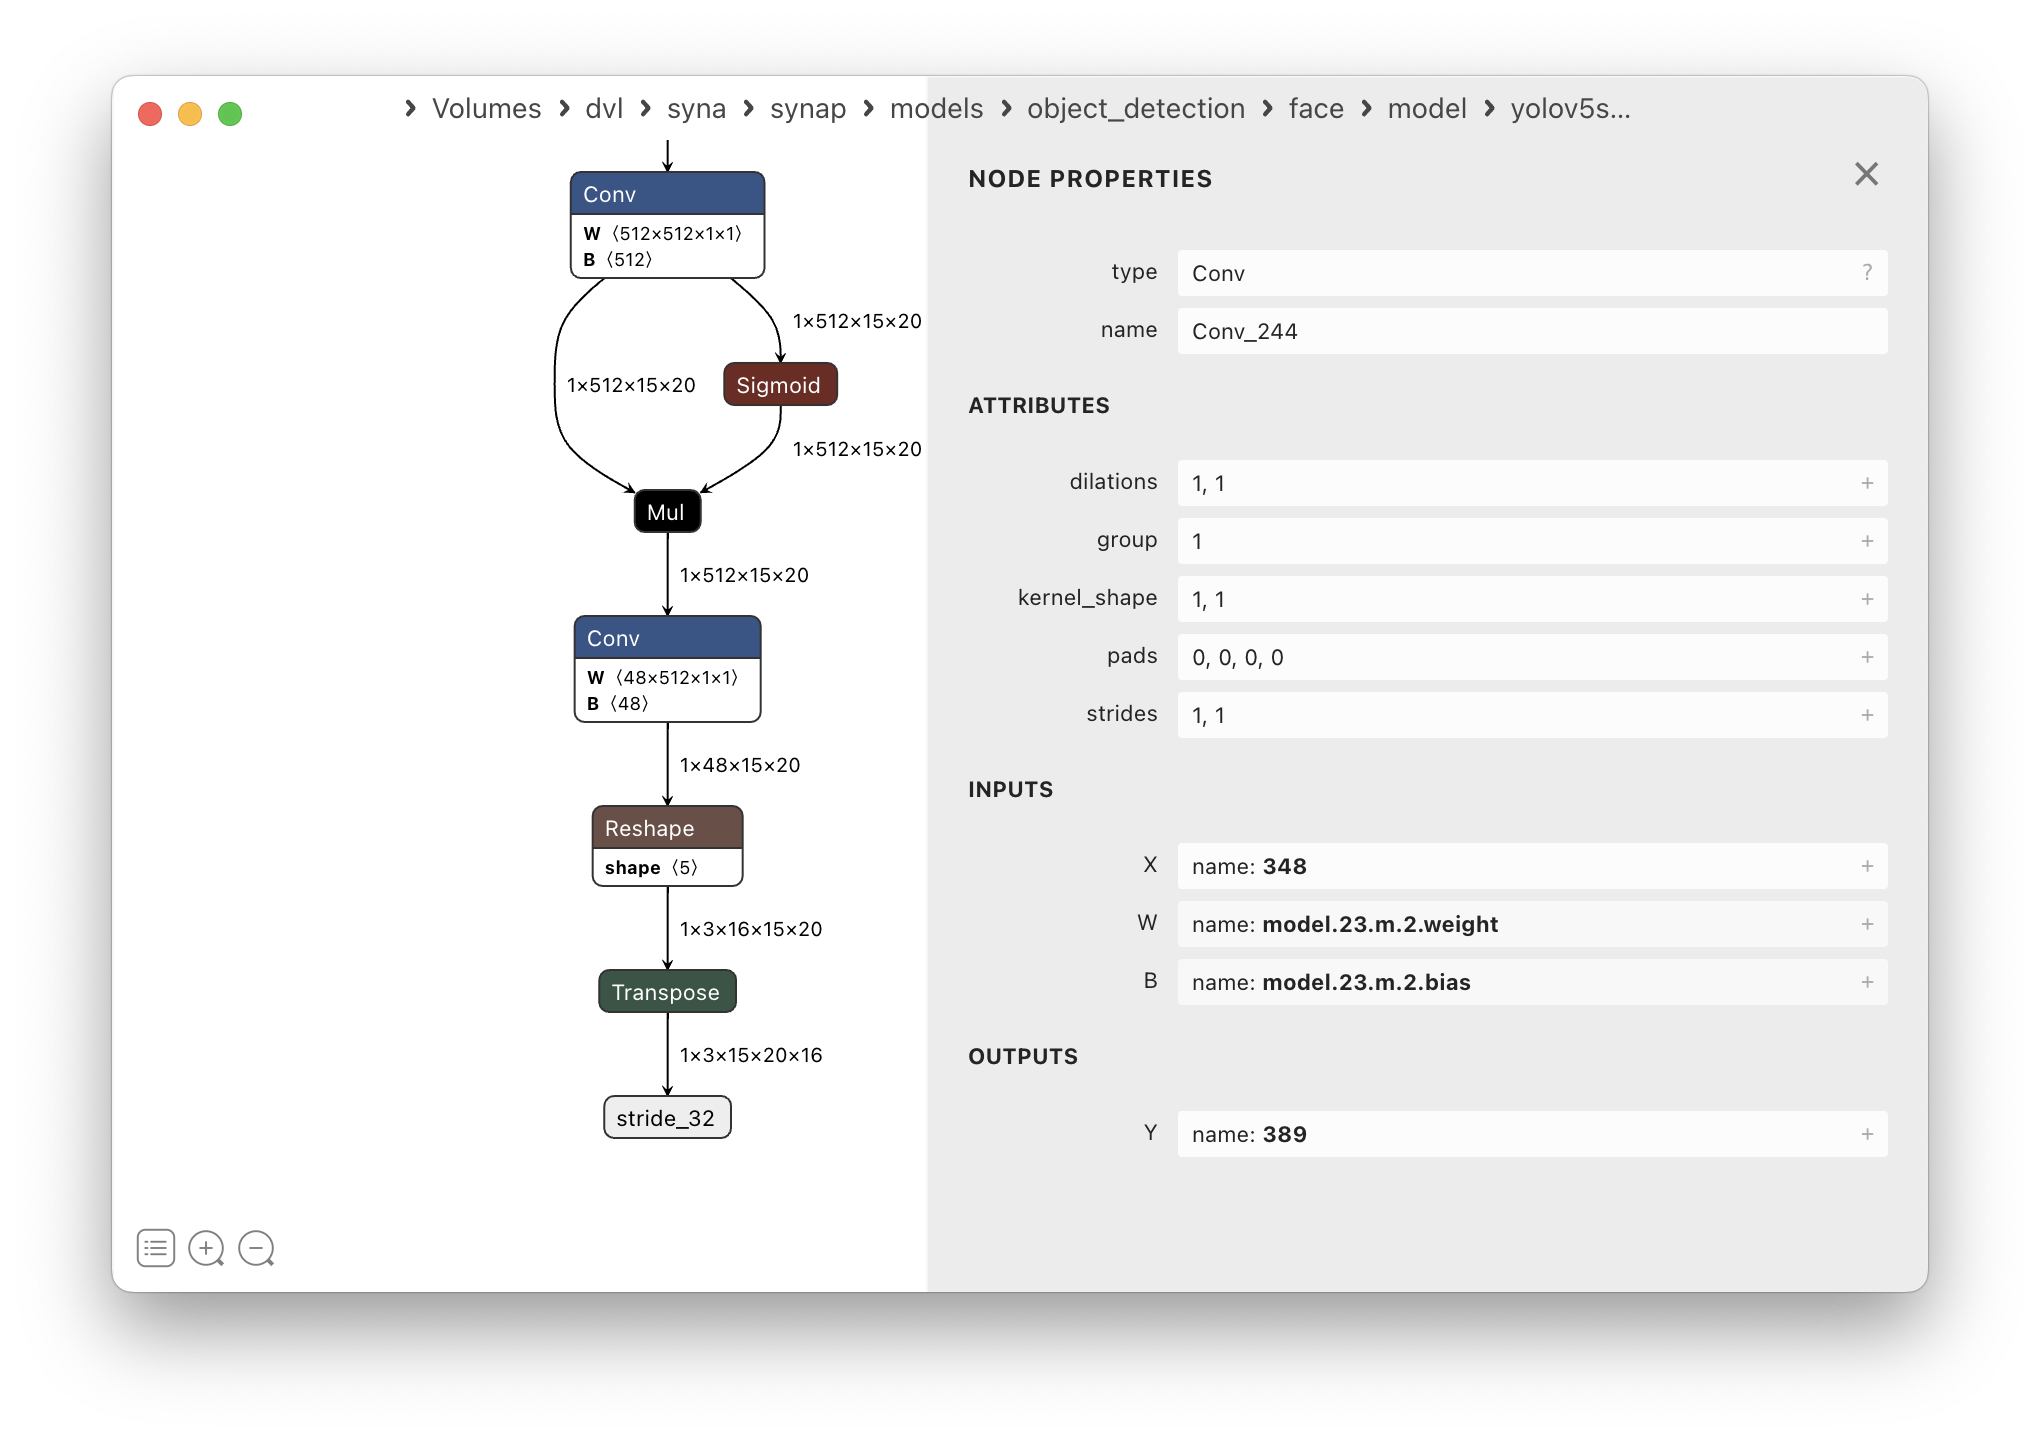
Final layers of yolov5s_face_480x640.onnx
This is a situation that happens quite often so SyNAP toolkit provides a way to remove these layers from the generated model at conversion time, without modifying the original model: all we have to do is specify the name of the final tensor(s) in the conversion metafile, all the layers after these tensors will be ignored and omitted from the compiled model. Our model has 3 outputs, so we prune each of them after the last convolution, at tensors “349”, “369” and “389”.
Since the layout of the data in the output tensors will now be different, we also have to inform
the postprocessing code so that it can interpret the results correctly. This is done with the
transposed=1 option in the format string:
inputs:
  - means: [0, 0, 0]
    scale: 255
outputs:
  - dequantize: true
    name: "349"  # Name of the output tensor of the last layer we want to keep
    format: yolov5 landmarks=5 transposed=1 anchors=[[],[],[],[4,5,8,10,13,16],[23,29,43,55,73,105],[146,217,231,300,335,433]]
  - dequantize: true
    name: "369"  # Name of the output tensor of the last layer we want to keep
  - dequantize: true
    name: "389"  # Name of the output tensor of the last layer we want to keep

quantization:
    data_type: uint8
    scheme: asymmetric_affine
    dataset:
      - qdataset/*.jpg
When we compile the model with this metafile we obtain a model.synap which is now a bit smaller and the outputs listed in the generated model_info.txt are actually the outputs of the last convolution layer:
$ cat compiled/model_info.txt
...
outputs:
  - name: attach_Conv_Conv_212/out0
    shape: [1, 48, 60, 80]
    layout: nchw
    format: yolov5 landmarks=5 transposed=1
        anchors=[[],[],[],[4,5,8,10,13,16],[23,29,43,55,73,105],[146,217,231,300,335,433]]
    type: float32
  - name: attach_Conv_Conv_228/out0
    shape: [1, 48, 30, 40]
    layout: nchw
    format: yolov5
    type: float32
  - name: attach_Conv_Conv_244/out0
    shape: [1, 48, 15, 20]
    layout: nchw
    format: yolov5
    type: float32
...
Running this model with synap_cli_od we can see that the detections are exactly the same as before
so pruning the model didn’t introduce any regression.
But inference time is now a bit better, we measure a median inference time of 26.86ms.
We are now ready to see how we can fix the quantization issues.
重要
Remove layers at the end of the model which are unnecessary or can be implemented faster using the CPU
改进量化数据集
One common reason for bad quantization results is that the quantization dataset is not representative enough, that is there are situations in real use that have never occoured during quantization, so the corresponding activation values in some layers cannot be represented and saturate or overflow, generating completely wrong results. This can be fixed by adding more or better samples to the quantization dataset.
Another possibility is that the range required to represent the weights or the activations is too wide, so the values cannot be represented with enough precision with the number of bits available. This can be fixed by increasing the number of quantization bits or in some cases by using a smarter quantization algorithm.
One way to check if the issue comes from the quantization dataset is to go in the opposite direction, that is use a quantization dataset with one single (or very few) sample, and use the same sample for inference. If even in this case the result is bad, we can be pretty sure that adding more samples will not improve the situation and we have to fix the quantization in some other way.
We requantize our model using the same metafile as before, but this time we quantize it using only the image we are using for inference:
...
quantization:
    data_type: uint8
    scheme: asymmetric_affine
    dataset:
      - qdataset/face_720p.jpg
The result we get is in the image here below.

Result of quantizing the model with the same image used for inference
Even with one single image the quantized result is poor, we now know that we have no hope of getting good results by just adding more samples to the quantization dataset.
重要
Check quantization limits by doing quantization and inference with the same sample data. In case of bad results it will not help to increase the quantization dataset. First check that the preprocessing information specified in the metafile are correct then try with a different quantization algorithm, or quantize with more bits.
Per-Channel和KL_divergence量化
SyNAP supports per-channel quantization scheme: in this case quantization will produce a specific quantization scale for each channel, instead of a single scale for the entire tensor as in standard quantization. Having a separate scale for each channel can improve the results a lot in those models which have large differences in weights values inside a convolution.
We can try per-channel quantization by specifying it in the conversion metafile:
...
quantization:
    data_type: int8
    scheme: perchannel_symmetric_affine
    dataset:
      - qdataset/*.jpg
Another possibility is to use a more advanced quantization algorithm. SyNAP toolkit provides kl_divergence algorithm, which is slower but can provide better results in problematic cases. As usual this can be configured in the conversion metafile:
...
quantization:
    data_type: uint8
    scheme: asymmetric_affine
    algorithm: kl_divergence
    dataset:
      - qdataset/*.jpg
In our case neither option showed visible improvements in the landmarks position. The only remaining option is to increase the number of bits used to represent quantized values.
重要
for problematic models per-channel quantization and/or kl_divergence algorithm can often provide better quantization results
16位量化
In addition to floating point and 8-bits computation, our NPU also supports 16-bits computation.
To take advantage of this feature, SyNAP toolkit allows to quantize a model to 16-bits.
This is a feature currently unavailable with standard .tflite models quantized with Tensorflow.
16-bits inference is slower than 8-bits by a factor of around 2 to 3. This is a lot, but still
much faster than floating-point inference and can provide a solution when 8-bits quantization
provides unacceptable results.
Again we configure this in the quantization section of the conversion metafile:
inputs:
  - means: [0, 0, 0]
    scale: 255
outputs:
  - dequantize: true
    name: "349"
    format: yolov5 landmarks=5 transposed=1 anchors=[[],[],[],[4,5,8,10,13,16],[23,29,43,55,73,105],[146,217,231,300,335,433]]
  - dequantize: true
    name: "369"
  - dequantize: true
    name: "389"

quantization:
    data_type: int16
    dataset:
      - qdataset/*.jpg
We convert our model and test it with synap_cli_od as before. The landmarks position finally
looks good!

Detections from our model quantized with 16-bits
Unfortunately, inference time don’t look good at all:
$ adb shell "cd /data/local/tmp/test && synap_cli -r 5 random"
    ....
    Predict #0: 67.51 ms
    Predict #1: 64.94 ms
    Predict #2: 65.24 ms
    Predict #3: 65.68 ms
    Predict #4: 65.59 ms

    Inference timings (ms):  load: 338.92  init: 51.61  min: 64.93  median: 65.58  max: 67.38  stddev: 0.85  mean: 65.76
Median inference time is now around 65ms, as expected we got an increase in inference time of more than two times. This is not acceptable for our application, what can we do?
重要
16-bits quantization can normally provide good quantization results at the price of increased inference time
混合量化
An additional feature of our NPU is the ability to specify the data type per layer. This is called mixed quantization and allows to select for each layer the data type to be used for the computation, so we can execute some layers in 8 bits, others in 16 bits fixed point and others in 16 bits floating point. This is another feature currently unavailable with standard quantized models and in many cases allows to find a good tradeoff between exceution speed and accuracy.
The first question is how to choose which layers to keep in 8 bits and which would benefit more from
a 16-bit quantization. From a theoretical point of view the best candidates for 16-bits quantization
are the layers that introduce the largest quantization error. A common measure for this is the
Kullback-Leibler divergence between the original and quantized weights and outputs distributions.
When the kl_divergence algorithm is selected, SyNAP toolkit generates a quantization_entropy.txt
file with the kl-divergence value of the weights and output for each layer.
The higher (closer to 1) the kl-divergence, the bigger the quantization error introduced by the
corresponding layer, and so the biggest advantage in quantizing it with 16-bits.
In practice the kl-divergence is not the only factor to consider when deciding which layers to keep in 8-bits and which to move to 16 bits:
each change in data-type (8bits to 16bits or 16bits to 8bits) requires a corresponding layer to perform the data conversion. These layers are added automatically by SyNAP toolkit but at runtime each conversion takes time, so the number of data changes should be minimized
the errors introduced don’t have all the same importance: in the initial part of the network when we are working with pixels that already have some noise, some additional quantization noise doesn’t normally generate much harm. In the final part of the network when we are already computing classes or coordinate offsets the effect of quantization errors can be much more visible.
In order to combine the two approaches, we first compile the model using algorithm: kl_divergence
and then we examine the generated quantization_entropy.txt file.
@Conv_Conv_0_212_acuity_mark_perm_220:out0, 0.27883491513891734
@Conv_Conv_11_174:out0, 0.3733763339858789
@Conv_Conv_17_191:out0, 0.4021046389971754
@Sigmoid_Sigmoid_15_180_Mul_Mul_16_167:out0, 0.405560572116115
@Conv_Conv_14_179:out0, 0.40564278569588696
...
@Conv_Conv_205_22:out0, 0.7342595588162942
@Concat_Concat_208_15:out0, 0.7357854636814533
@Conv_Conv_213_4:out0, 0.7585377393897166
@Sigmoid_Sigmoid_206_23_Mul_Mul_207_16:out0, 0.7683961679254856
@Sigmoid_Sigmoid_210_10_Mul_Mul_211_6:out0, 0.8057662225936256
...
@Conv_Conv_202_30:weight, 0.5096223462373272
@Conv_Conv_6_203:weight, 0.5118887173396539
@Conv_Conv_162_38:weight, 0.5121908770041979
@Conv_Conv_169_13:weight, 0.5144894053732241
@Conv_Conv_209_9:weight, 0.5147316014944239
@Conv_Conv_3_213:weight, 0.5169572774188768
@Conv_Conv_11_174:weight, 0.5183437879100847
@Conv_Conv_192_59:weight, 0.5229359023069913
@Conv_Conv_212_5:weight, 0.6613776358217723
@Conv_Conv_213_4:weight, 0.696057611379417
@Conv_Conv_214_3:weight, 0.7661783138044042
We notice that in general the final layers tend to have a higher entropy than those at the beginning of the network. We also observe that our biggest problems are with the coordinates of the landmarks which are computed in the network head. So it seems a good idea to quantize the network backbone in 8-bits and the head in 16-bits.

Head of yolov5s_face_480x640.onnx
From the network diagram and documentation we see that most of the head processing occurs after layer Concat_155
(circled red in the picture) so as a first guess we decide to quantize in 16 bits all the layers after this point.
Luckily we don’t have to enumerate all those layers by hand, SyNAP provides a shortcut syntax to
express exactly this. Here the required changes in the conversion metafile:
...
quantization:
    data_type:
        '*': uint8              # Default data type
        Concat_155...: int16    # Data type for network head
    dataset:
      - qdataset/*.jpg
After compiling the model as usual we test the detection again using synap_cli_od.

Detections from our model with mixed quantization
The landmarks position looks almost as good as the one we get with full 16-bits quantization.
We measure the timing with synap_cli and we get a median inference time of 31.61ms, just
5ms more of what we had with full 8-bits quantization but with much better results.
Of course at this point we could setup an automated script to actually measure the quality of the quantization (for example measure the mean squared error between the quantized landmarks position and the ones we get with the floating point model) and fine-tune the layer(s) where to switch to 16-bits quantization in order to get the most suitable tradeoff between desired accuracy and inference time. For this preliminary study this is not needed.
重要
mixed quantization can often provide a good tradeoff between execution speed and accuracy
重要
16-bits floating point (float16) can provide even greater accuracy than 16-bits fixed point (int16), but is even slower and normally not needed
移除不需要的输出
We are already quite satisfied with the performance of our quantized model, but we notice that in our application we will never have faces that are too close to the camera, and that we are not interested in faces that are too far away. The processing done in the model for the corresponding pyramid elements (outputs 0 and 2) is thus wasted. Since we don’t want to change the original model we can use the same technique used in 移除不必要的图层 and prune the model at conversion time with SyNAP. In this case we prune away two complete branches of the network, precisely those corresponding to the first and third outputs. We do this by removing the corresponding output names from the conversion metafile, and their anchors from the format string. Here our final version.
inputs:
  - means: [0, 0, 0]
    scale: 255
outputs:
  - name: "369"
    format: yolov5 landmarks=5 transposed=1 anchors=[[],[],[],[],[23,29,43,55,73,105]]
    dequantize: true

quantization:
    data_type:
        '*': uint8
        Concat_155...: int16
    dataset:
      - qdataset/*.jpg
Measuring inference time with synap_cli we get our final median inference time of 30.25ms.
重要
model outputs that are not needed can be pruned away
使用 NPU 执行输入预处理
We now notice that our model takes in input an RGB image, but our camera actually provides images in YUV 1024x768. The required data preprocessing (applying mean and scale plus format and size conversion) can be done either in SW or using the NPU. In most cases the NPU can do it faster but performing the preprocessing in SW has the advantage that it can be parallelized with NPU inference, so the choice is application-dependent.
As usual if we want to perform preprocessing with the NPU we don’t have to modify the model itsef,
we can specify this at conversion time by adding the preprocess option to the input specification:
inputs:
  - means: [0, 0, 0]
    scale: 255
    preprocess:
        type: nv12
        size: [1024, 768]
We test the performance but we see that preprocessing increases the inference time to more than 35ms
so we decide that it’s better to do this with the CPU to achieve better parallelism.
重要
NPU is able to perform preprocessing at inference time. It’s application dependent if this is preferable to CPU-preprocessing or not
我仍然不能满足我的要求
It is possible that despite all the optimization efforts done, the final model obtained still doesn’t satisfy the expected target of inference speed and/or accuracy.
In these cases we still have a few options:
use a smaller model, maybe with lower accuracy
use a better model: model architectures are constantly improving it’s possible that a newer model exists that can provide similar or better accuracy with a smaller size and lower computational requirements
use a more fit model: some models can run more efficiently than others on our NPU so they can run faster even if they are more computationally expensive. The efficiency of a model is hard to specify exactly as it depends on many factors: for sure models that contain a lot of data layout reorganizations or pointwise operations (e.g. tensor add) or convolutions with very few channels are not able to fully take advantge of the parallel convolutional cores of the NPU and so are not able to take fully adavtage of the computationa resources available.
run the model layer-by-layer: step-by-step execution allows to measure the inference timing of each layer and therfore to see where the bottlenecks are and to adapt the model accordingly or guide the selection of a more fit model
relax the requirements: sometimes the requirements are not as strict as we think. For example there is no way we can run the face-detection model seen above at 50 FPS. But if we have a 50 FPS video we could as well run the model every other frame and still provide the desired functionality
重要
if the targets of speed and accuracy cannot be met, consider using a better model if possible or relax the requirements
结论
We have shown with a real-life example how to use SyNAP toolkit to import, quantize and optimize a model. We have been able to take a model and make it run with the required speed and accuracy. Even if each model and application present their own specific requirements and challanges the steps discussed are quite common and provide a good starting point for a process that can be later customized and improved according to individual needs.