框架API
The core functionality of the Synap framework is to execute a precompiled neural network.
This is done via the Network class. The Network class has been designed to be simple to use
in the most common cases while still being flexible enough for most advanced use-cases.
The actual inference will take place on different HW units (NPU, GPU, CPU or a combination of them)
according to how the model has been compiled.
基本用法
Network Class
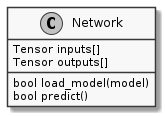
The Network class is extremely simple, as shown in the picture here below.
There are just two things that can be done with a network:
load a model, by providing the compiled model in
.synapformatexecute an inference
A network also has an array of input tensors where to put the data to be processed, and an array of output tensors which will contain the result(s) after each inference.
-
class Network
Load and execute a neural network on the NPU accelerator.
Public Functions
-
bool load_model(const std::string &model_file, const std::string &meta_file = "")
Load model.
In case another model was previously loaded it is disposed before loading the one specified.
- Parameters:
model_file – path to .synap model file. Can also be the path to a legacy .nb model file.
meta_file – for legacy .nb models must be the path to the model’s metadata file (JSON-formatted). In all other cases must be the empty string.
- Returns:
true if success
-
bool load_model(const void *model_data, size_t model_size, const char *meta_data = nullptr)
Load model.
In case another model was previously loaded it is disposed before loading the one specified.
- Parameters:
model_data – model data, as from e.g. fread() of model.synap The caller retains ownership of the model data and can delete them at the end of this method.
model_size – model size in bytes
meta_data – for legacy .nb models must be the model’s metadata (JSON-formatted). In all other cases must be nullptr.
- Returns:
true if success
-
bool predict()
Run inference.
Input data to be processed are read from input tensor(s). Inference results are generated in output tensor(s).
- Returns:
true if success, false if inference failed or network not correctly initialized.
-
bool load_model(const std::string &model_file, const std::string &meta_file = "")
使用网络
The prerequisite in order to execute a neural network is to create a Network object and load its
model in .synap format. This file is generated when the network is converted using the
Synap toolkit.
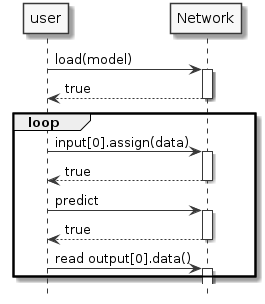
This has to be done only once, after a network has been loaded it is ready to be used for inference:
put the input data in the Network input tensor(s)
call network
predict()methodget the results from the Network input tensor(s)
Example:
Network net;
net.load_model("model.synap");
vector<uint8_t> in_data = custom_read_input_data();
net.inputs[0].assign(in_data.data(), in_data.size());
net.predict();
custom_process_result(net.outputs[0].as_float(), net.outputs[0].item_count());
Please note that:
all memory allocations and alignment for the weights and the input/ouput data are done automatically by the Network object
all memory is automatically deallocated when the Network object is destroyed
for simplicity all error checking has been omitted, methods typically return
falseif something goes wrong. No explicit error code is returned since the error can often be too complex to be explained with a simple enum code and normally there is not much the caller code can do do to recover the situation. More detailed information on what went wrong can be found in the logs.the routines named custom… are just placeholders for user code in the example.
In the code above there is a data copy when assigning the
in_datavector to the tensor. The data contained in thein_datavector can’t be used directly for inference because there is no guarantee that they are correcly aligned and padded as required by the HW. In most cases the cost of this extra copy is negligible, when this is not the case the copy can sometimes be avoided by writing directly inside the tensor data buffer, something like:custom_generate_input_data(net.inputs[0].data(), net.inputs[0].size()); net.predict();For more details see section 访问 Tensor Data
the type of the data in a tensor depends on how the network has been generated, common data types are float16, float32 and quantized uint8 and int16. The
assign()andas_float()methods take care of all the required data conversions.
By using just the simple methods shown in this section it is possible to perform inference with the NPU hardware accelerator. This is almost all that one needs to know in order to use SyNAP in most applications. The following sections explain more details of what’s going on behind the scenes: this allows to take full advantage of the available HW for more demanding use-cases.
高级主题
Tensors
We’ve seen in the previous section that all accesses to the network input and output data are done
via tensor objects, so it’s worth looking in detail at what a Tensor object can do.
Basically a tensor allows to:
get information and attributes about the contained data
access data
access the underlying
Bufferused to contain data. More on this in the next section.
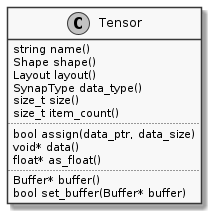
Let’s see a detailed description of the class and the available methods.
Tensor class
-
class Tensor
Synap data tensor.
It’s not possible to create tensors outside a Network, users can only access tensors created by the Network itself.
Public Functions
-
const std::string &name() const
Get the name of the tensor.
Can be useful in case of networks with multiple inputs or outputs to identify a tensor with a string instead of a positional index.
- Returns:
tensor name
-
const Shape &shape() const
Get the Shape of the Tensor, that is the number of elements in each dimension.
The order of the dimensions is specified by the tensor layout.
- Returns:
tensor shape
-
const Dimensions dimensions() const
Get the Dimensions of the Tensor, that is the number of elements in each dimension.
The returned values are independent of the tensor layout.
- Returns:
tensor dimensions (all 0s if the rank of the tensor is not 4)
-
Layout layout() const
Get the layout of the Tensor, that is how data are organized in memory.
SyNAP supports two layouts:
NCHWandNHWC. The N dimension (number of samples) is present for compatibility with standard conventions but must always be one.- Returns:
tensor layout
-
std::string format() const
Get the format of the Tensor, that is a description of what the data represents.
This is a free-format string whose meaning is application dependent, for example “rgb”, “bgr”.
- Returns:
tensor format
-
DataType data_type() const
Get tensor data type.
The integral types are used to represent quantized data. The details of the quantization parameters and quantization scheme are not directly available, an user can use quantized data by converting them to 32-bits float using the
as_float()method below- Returns:
the type of each item in the tensor.
-
Security security() const
Get tensor security attribute.
- Returns:
security attribute of the tensor (none if the model is not secure).
-
size_t size() const
- Returns:
size in bytes of the tensor data
-
size_t item_count() const
Get the number of items in the tensor.
A tensor
size()is alwas equal toitem_count()multiplied by the size of the tensor data type.- Returns:
number of data items in the tensor
-
bool is_scalar() const
- Returns:
true if this is a scalar tensor, that is it contains a single element. (the shape of a scalar tensor has one dimension, equal to 1)
-
bool assign(const uint8_t *data, size_t count)
Normalize and copy data to the tensor data buffer.
The data is normalized and converted to the type and quantization scheme of the tensor. The data count must be equal to the
item_count()of the tensor.- Parameters:
data – pointer to data to be copied
count – number of data items to be copied
- Returns:
true if success
-
bool assign(const int16_t *data, size_t count)
Normalize and copy data to the tensor data buffer.
The data is normalized and converted to the type and quantization scheme of the tensor. The data count must be equal to the
item_count()of the tensor.- Parameters:
data – pointer to data to be copied
count – number of data items to be copied
- Returns:
true if success
-
bool assign(const float *data, size_t count)
Normalize and copy data to the tensor data buffer.
The data is normalized and converted to the type and quantization scheme of the tensor. The data count must be equal to the
item_count()of the tensor.- Parameters:
data – pointer to data to be copied
count – number of data items to be copied
- Returns:
true if success
-
bool assign(const void *data, size_t size)
Copy raw data to the tensor data buffer.
The data is considered as raw data so no normalization or conversion is done whatever the actual data-type of the tensor. The data size must be equal to the
size()of the tensor.- Parameters:
data – pointer to data to be copied
size – size of data to be copied
- Returns:
true if success
-
bool assign(const Tensor &src)
Copy the content of a tensor to the tensor data buffer.
No normalization or conversion is done, the data type and size of the two tensors must match
- Parameters:
src – source tensor containing the data to be copied.
- Returns:
true if success, false if type or size mismatch
-
bool assign(int32_t value)
Writes a value to the tensor data buffer.
Only works if the tensor is a scalar. The value is converted to the tensor data type: 8, 16 or 32 bits integer. Before writing in the data buffer the value is also rescaled if needed as specified in the tensor format attributes.
- Parameters:
value – value to be copied
- Returns:
true if success
-
template<typename T>
T *data() Get a pointer to the beginning of the data inside the tensor data buffer if it can be accessed directly.
This is the case only if T matches the
data_type()of the tensor and no normalization/quantization is required (or normalization and quantization simplify-out each other). Sample usage:uint8_t* data8 = tensor.data<uint8_t>();- Returns:
pointer to the data inside the data buffer or nullptr.
-
void *data()
Get a pointer to the beginning of the data inside the tensor data buffer, if any.
The method returns a
voidpointer since the actual data type is what returned by thedata_type()method.- Returns:
pointer to the raw data inside the data buffer, nullptr if none.
-
const float *as_float() const
Get a pointer to the tensor content converted to float.
The method always returns a
floatpointer. If the actual data type of the tensor is not float, the conversion is performed interally, so the user doesn’t have to care about how the data are internally represented.Please note that this is a pointer to floating point data inside the tensor itself: this means that the returned pointer must not be freed, memory will be released automatically when the tensor is destroyed.
- Returns:
pointer to float[item_count()] array representing tensor content converted to float (nullptr if tensor has no data)
-
Buffer *buffer()
Get pointer to the tensor’s current data Buffer if any.
This will be the default buffer of the tensor unless the user has assigned a different buffer using set_buffer()
- Returns:
current data buffer, or nullptr if none
-
bool set_buffer(Buffer *buffer)
Set the tensor’s current data buffer.
The buffer size must be 0 or match the tensor size otherwise it will be rejected (empty buffers are automatically resized to the the tensor size). Normally the provided buffer should live at least as long as the tensor itself. If the buffer object is destroyed before the tensor, it will be automatically unset and the tensor will remain buffer-less.
- Parameters:
buffer – buffer to be used for this tensor. The buffer size must match the tensor size (or be 0).
- Returns:
true if success
-
struct Private
-
const std::string &name() const
Here below a list of all the data types supported in a tensor:
Buffers
The memory used to store a tensor data has to satisfy the following requirements:
must be correctly aligned
must be correctly padded
in some cases must be contiguous
must be accessible by the NPU HW accelerator and by the CPU or other HW components
Memory allocated with malloc() or new or std::vector doesn’t satisfy these
requirements so can’t be used directly as input or output of a Network.
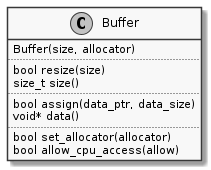
For this reason Tensor objects use a special Buffer class to handle memory. Each
tensor internally contains a default Buffer object to handle the memory used for the data.
The API provided by the Buffer is similar when possible to the one provided by
std::vector. The main notable exeception is that a buffer content can’t be indexed
since a buffer is just a container for raw memory, without a data type.
The data type is known by the tensor which is using the buffer.
Buffer is also taking care of disposing the allocated memory when it is destroyed (RAII)
to avoid all possible memory leakages. The actual memory allocation is done via an additional
Allocator object. This allows to allocate memory with different attributes in different
memory area. When a buffer object is created it will use the default allocator unless a different
allocator is specified. The allocator can be specified directly in the constructor or later using the
set_allocator() method.
In order for the buffer data to be shared by the CPU and NPU hardware some extra operations have to be done to ensure that the CPU caches and system memory are correcly aligned. All this is done automatically when the buffer content is used in the Network for inference. There are cases when the CPU is not going to read/write the buffer data directly, for example when the data is generated by another HW component (eg. video decoder). In these cases it’s possible to have some performance improvements by disabling CPU access to the buffer using the method provided.
备注
it is also possible to create a buffer that refers to an existing memory area instead of using an allocator. In this case the memory area must have been registered with the TrustZone kernel and must be correctly aligned and padded. Furthermore the Buffer object will not free the memory area when it is destroyed, since the memory is supposed to be owned by the SW module which allocated it.
-
class Buffer
Synap data buffer.
Public Functions
-
Buffer(Allocator *allocator = nullptr)
Create an empty data buffer.
- Parameters:
allocator – allocator to be used (default is malloc-based)
-
Buffer(size_t size, Allocator *allocator = nullptr)
Create and allocate a data buffer.
- Parameters:
size – buffer size
allocator – allocator to be used (default is malloc-based)
-
Buffer(uint32_t mem_id, size_t offset, size_t size)
Create a data buffer to refer to an existing memory area.
The user must make sure that the provided memory is correctly aligned and padded. The specified memory area will not be deallocated when the buffer is destroyed. It is the responsiblity of the caller to release mem_id after the Buffer has been destroyed.
- Parameters:
mem_id – id of an existing memory area registered with the TZ kernel.
offset – offset of the actual data inside the memory area
size – size of the actual data
-
Buffer(uint32_t handle, size_t offset, size_t size, bool is_mem_id)
Create a data buffer to refer to an existing memory area.
The user must make sure that the provided memory is correctly aligned and padded. The specified memory area will not be deallocated when the buffer is destroyed. It is the responsiblity of the caller to release mem_id after the Buffer has been destroyed.
- Parameters:
handle – fd of an existing dmabuf or mem_id registered with the TZ kernel.
offset – offset of the actual data inside the memory area
size – size of the actual data
is_mem_id – true if the first argument is a mem_id, false if it is a fd
-
Buffer(const Buffer &rhs, size_t offset, size_t size)
Create a data buffer that refers to a part of the memory area of an existing buffer.
The memory of the provided buffer must have already been allocated. To avoid referring to released memory, the existing buffer memory must not be deallocated before this buffer is destroyed.
-
Buffer(Buffer &&rhs) noexcept
Move constructor (only possible from buffers not yet in use by a Network)
-
Buffer &operator=(Buffer &&rhs) noexcept
Move assignment (only possible for buffers not yet in use by a Network)
-
bool resize(size_t size)
Resize buffer.
Only possible if an allocator was provided. Any previous content is lost.
- Parameters:
size – new buffer size
- Returns:
true if success
-
bool assign(const void *data, size_t size)
Copy data in buffer.
Always successful if the input data size is the same as current buffer size, otherwise the buffer is resized if possible.
- Parameters:
data – pointer to data to be copied
size – size of data to be copied
- Returns:
true if all right
-
size_t size() const
Actual data size.
-
const void *data() const
Actual data.
-
bool allow_cpu_access(bool allow)
Enable/disable the possibility for the CPU to read/write the buffer data.
By default CPU access to data is enabled. CPU access can be disabled in case the CPU doesn’t need to read or write the buffer data and can provide some performance improvements when the data is only generated/used by another HW components.
Note
reading or writing buffer data while CPU access is disabled might cause loss or corruption of the data in the buffer.
- Parameters:
allow – false to indicate the CPU will not access buffer data
- Returns:
current setting
-
bool set_allocator(Allocator *allocator)
Change the allocator.
Can only be done if the buffer is empty.
- Parameters:
allocator – allocator
- Returns:
true if success
-
Buffer(Allocator *allocator = nullptr)
Allocators
Two allocators are provided for use with buffer objects:
the standard allocator: this is the default allocator used by buffers created without explicitly specifying an allocator. The memory is paged (non-contiguous).
the cma allocator: allocates contiguous memory. Contiguous memory is required for some HW components and can provide some small performance improvement if the input/output buffers are very large since less overhead is required to handle memory pages. Should be used with great care since the contiguous memory available in the system is quite limited.
-
Allocator *std_allocator()
return a pointer to the system standard allocator.
-
Allocator *cma_allocator()
return a pointer to the system contiguous allocator.
重要
The calls above return pointers to global objects, so they must NOT be deleted after use
高级示例
访问 Tensor Data
Data in a Tensor is normally written using the Tensor::assign(const T* data, size_t count) method.
This method will take care of any required data normalization and data type conversion from
the type T to the internal representation used by the network.
Similarly the output data are normally read using the Tensor::as_float() method that
provides a pointer to the tensor data converted to floating point values from whatever internal
represention is used.
These conversions, even if quite optimized, present however a runtime cost that is proportional to
the size of the data. For input data this cost could be avoided by generating them directly in
the Tensor data buffer, but this is only possible when the tensor data type corresponds to
that of the data available in input and no additional normalization/quantization is required.
Tensor provides a type-safe data<T>() access method that will return a pointer to the data in the
tensor only if the above conditions are satisfied, for example:
uint8_t* data_ptr = net.inputs[0].data<uint8_t>();
if (data_ptr) {
custom_generate_data(data_ptr, net.inputs[0].item_count());
}
If the data in the tensor is not uint8_t or normalization/[de]quantization is required, the returned
value will be nullptr. In this case the direct write or read is not possible and assign()
or as_float() is required.
It’s always possible to access the data directly by using the raw data() access method which
bypasses all checks:
void* in_data_ptr = net.inputs[0].data();
void* out_data_ptr = net.outputs[0].data();
In the same way it’s also possible to assign raw data (without any conversion)
by using void* data pointer:
const void* in_raw_data_ptr = ....;
net.inputs[0].assign(in_raw_data_ptr, size);
In these cases it’s responsibility of the user to know how the data are represented and how to handle them.
设置 Buffers
If the properties of the default tensor buffer are not suitable, the user can explicity create a new buffer and use it instead of the default one. For example suppose we want to use a buffer with contiguous memory:
Network net;
net.load_model("model.synap");
// Replace the default buffer with one using contiguous memory
Buffer cma_buffer(net.inputs[0].size(), cma_allocator());
net.inputs[0].set_buffer(&cma_buffer);
// Do inference as usual
custom_generate_input_data(net.inputs[0].data(), net.inputs[0].size());
net.predict();
设置缺省的 Buffer 属性
A simpler alternative to replacing the buffer used in a tensor as seen in the previous section is to directly change the properties of the default tensor buffer. This can only be done at the beginning, before the tensor data is accessed:
Network net;
net.load_model("model.synap");

// Use contiguous allocator for default buffer in input[0]
net.inputs[0].buffer()->set_allocator(cma_allocator());

// Do inference as usual
custom_generate_input_data(net.inputs[0].data(), net.inputs[0].size());
net.predict();
Buffer 共享
The same buffer can be shared among multiple networks if they need to process the same input data. This avoids the need of redundant data copies:
Network net1;
net1.load_model("nbg1.synap");
Network net2;
net2.load_model("nbg2.synap");

// Use a common input buffer for the two networks (assume same input size)
Buffer in_buffer;
net1.inputs[0].set_buffer(&in_buffer);
net2.inputs[0].set_buffer(&in_buffer);

// Do inference as usual
custom_generate_input_data(in_buffer.data(), in_buffer.size());
net1.predict();
net2.predict();
Another interesting case of buffer sharing is when the output of a network must be processed directly by another network. For example the first network can do some preprocessing and the second one the actual inference. In this case setting the output buffer of the first network as the input buffer of the second network allows to completely avoid data copying (the two tensors must have the same size of course). Furthermore, since the CPU has no need to access this intermediate data, it is convenient to disable its access to this buffer, this will avoid the un-necessary overhead of cache flushing and provide an additional improvement in performance.
Network net1;
net1.load_model("nbg1.synap");
Network net2;
net2.load_model("nbg2.synap");

// Use net1 output as net2 input. Disable CPU access for better performance.
net1.outputs[0].buffer()->allow_cpu_access(false);
net2.inputs[0].set_buffer(net1.outputs[0].buffer()));

// Do inference as usual
custom_generate_input_data(net1.inputs[0].data(), net1.inputs[0].size());
net1.predict();
net2.predict();
One last case is when the output of the first network is smaller than the input of the second network, and we still want to avoid copy. Imagine for example that the output of net1 is an image 640x360 that we want to generate inside the input of net2 which expects an image 640x480. In this case the buffer sharing technique shown above can’t work due to the mismatch in size of the two tensors. What we need instead is to share part of the memory used by the two Buffers.
Network net2;  // Important: this has to be declared first, so it is destroyed after net1
net2.load_model("nbg2.synap");
Network net1;
net1.load_model("nbg1.synap");

// Initialize the entire destination tensor now that we still have CPU access to it
memset(net2.inputs[0].data(), 0, net2.inputs[0].size());

// Replace net1 output buffer with a new one using (part of) the memory of net2 input buffer
*net1.outputs[0].buffer() = Buffer(*net2.inputs[0].buffer(), 0, net2.outputs[0].size());

// Disable CPU access for better performance
net1.outputs[0].buffer()->allow_cpu_access(false);
net2.inputs[0].buffer()->allow_cpu_access(false);

// Do inference as usual
custom_generate_input_data(net1.inputs[0].data(), net1.inputs[0].size());
net1.predict();
net2.predict();
备注
Since net1 input tensor now uses the memory allocated by net2, it is important that net1 is destroyed before net2, otherwise it will be left pointing to unallocated memory. This limitation will be fixed in the next release.
Recycling Buffers
It is possible for the user to explicitly set at any time which buffer to use for each tensor in a network. The cost of this operation is very low compared to the creation of a new buffer so it is possible to change the buffer associated to a tensor at each inference if desired.
Despite this, the cost of creating a buffer and setting it to a tensor the first time is quite high
since it involves multiple memory allocations and validations. It is possible but deprecated to
create a new Buffer at each inference, better to create the required buffers in advance
and then just use set_buffer() to choose which one to use.
As an example consider a case where we want to do inference on the current data while at the same time preparing the next data. The following code shows how this can be done:
Network net;
net.load_model("model.synap");

// Create two input buffers
const size_t input_size = net.inputs[0].size();
vector<Buffer> buffers { Buffer(input_size), Buffer(input_size) };

int current = 0;
custom_start_generating_input_data(&buffers[current]);
while(true) {
    custom_wait_for_input_data();

    // Do inference on current data while filling the other buffer
    net.inputs[0].set_buffer(&buffers[current]);
    current = !current;
    custom_start_generating_input_data(&buffers[current]);
    net.predict();
    custom_process_result(net.outputs[0]);
}
使用 BufferCache
There are situations where the data to be processed comes form other components that provide each time a data block taken from a fixed pool of blocks. Each block can be uniquely identified by an ID or by an address. This is the case for example of a video pipeline providing frames.
Processing in this case should proceed as follows:
Get the next block to be processed
If this is the first time we see this block, create a new
Bufferfor it and add it to a collectionGet the
Buffercorresponding to this block from the collectionSet is as the current buffer for the input tensor
Do inference and process the result
The collection is needed to avoid the expensive operation of creating a new Buffer each time.
This is not complicate to code but steps 2 and 3 are always the same.
The BufferCache template takes care of all this. The template parameter allows to specify
the type to be used to identify the received block, this can be for example a BlockID or directly
the address of the memory area.
备注
In this case the buffer memory is not allocated by the Buffer object.
The user is responsible for ensuring that all data is properly padded and aligned.
Futhermore the buffer cache is not taking ownership of the data block, it’s responsibility
of the user to deallocate them in due time after the BufferCache has been deleted.
复制和移动
Network, Tensor and Buffer objects internally access to HW resources so
can’t be copied. For example:
Network net1;
net1.load_model("model.synap");
Network net2;
net2 = net1;  // ERROR, copying networks is not allowed
However Network and Buffer objects can be moved since this has no overhead and
can be convenient when the point of creation is not the point of use. Example:
Network my_create_network(string nb_name, string meta_name) {
    Network net;
    net.load(nb_name, meta_name);
    return net;
}

void main() {
    Network network = my_create_network("model.synap");
    ...
}
The same functionality is not available for Tensor objects, they can exist only inside
their own Network.
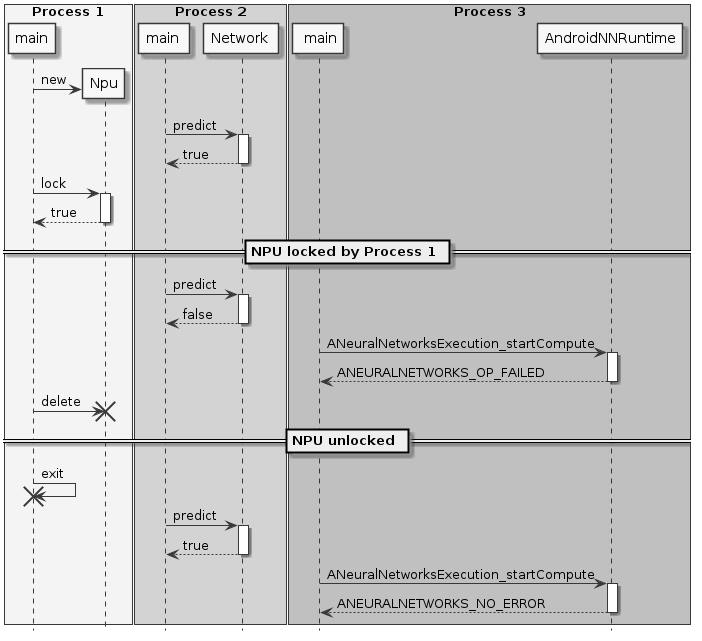
NPU 锁定
An application can decide to reserve the NPU for its exclusive usage. This can be useful in case of realtime applications that have strict requirements in terms of latency, for example video or audio stream processing.
Locking the NPU can be done at two levels:
reserve NPU access to the current process using
Npu::lock()reserve NPU for offline use only (that is disable NPU access from NNAPI)
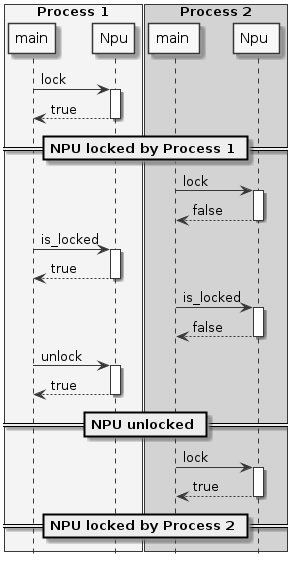
NPU 锁定
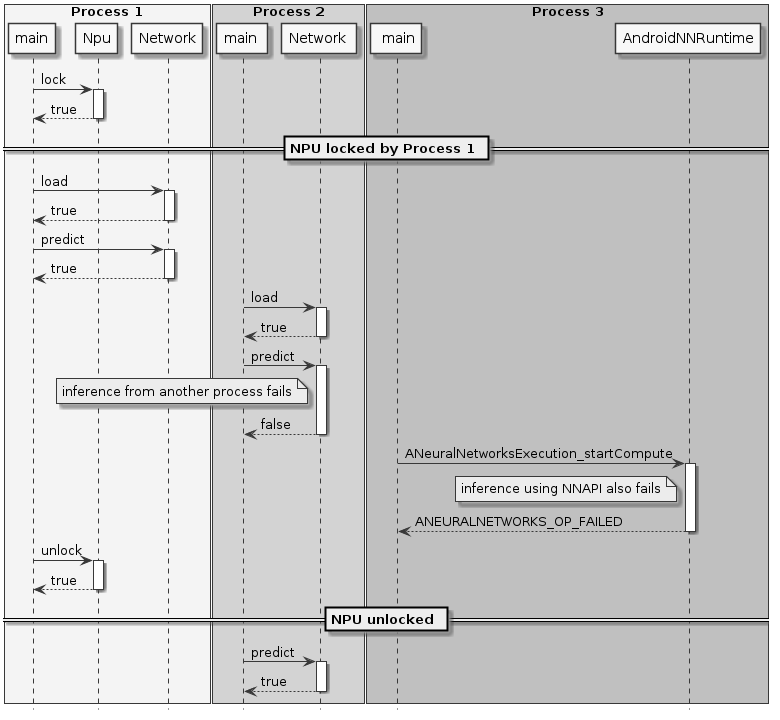
The NPU locking is done by process, this means that once the Npu::lock() API
is called no other process will be able to run inference on the NPU.
Other processes will still be able to load networks, but if they try to do offline or online
NNAPI inference or to lock() the NPU again, they will fail.
The process which has locked the NPU is the only one which has the righs to unlock it. If a process with a different PID tries to unlock() the NPU, the operation will be ignored and have no effect.
备注
There is currently no way for a process to test if the NPU has been locked by some other process. The only possibility is to try to lock() the NPU, if this operation fails it means that the NPU is already locked by another process or unavailable due to some failure.
备注
If the process owning the NPU lock terminates or is terminated for any reason, the lock is automatically released.
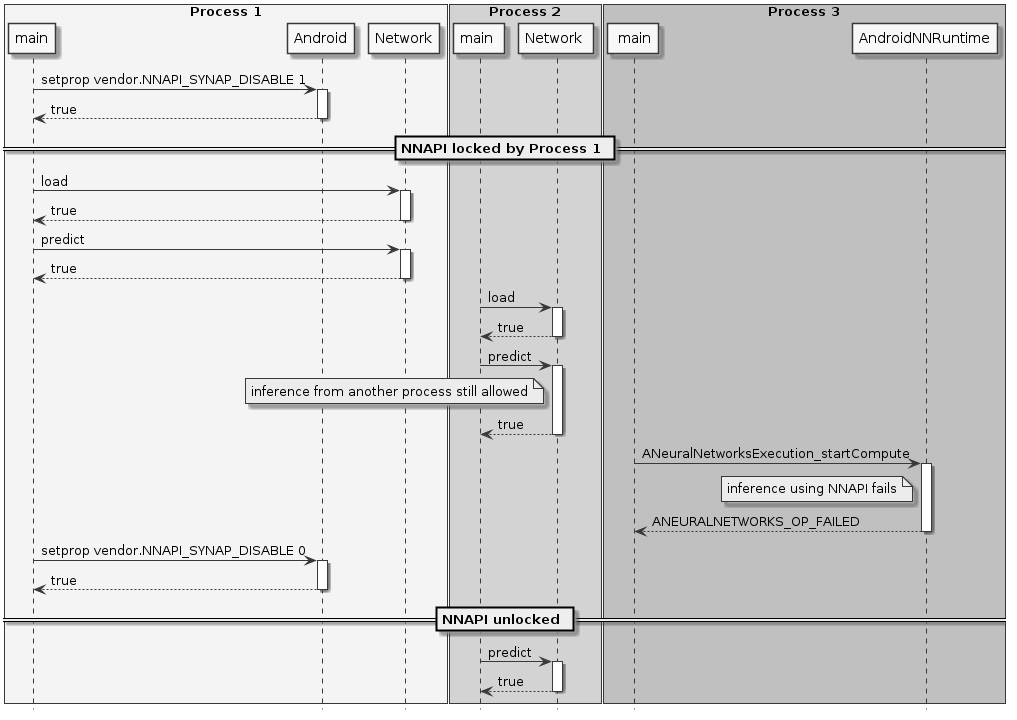
NNAPI 锁定
A process can reserve the NPU for offline use only so that nobody will be able to run online
inference on the NPU via NNAPI.
Other processes will still be able to run offline inference on the NPU.
SyNAP has no dedicated API for this, NNAPI can be disabled by setting the property vendor.NNAPI_SYNAP_DISABLE
to 1 using the standard Android API __system_property_set() or android::base::SetProperty().
Sample code in:
https://android.googlesource.com/platform/system/core/+/master/toolbox/setprop.cpp
See also: 从 NNAPI 禁用NPU
备注
It will still be possible to perform online inference on the NPU using the timvx tflite delegate.
描述
The Npu class controls the locking and unlocking of the NPU.
Normally only one object of this class needs to be created when the applicaton start and destroyed
when the application is going to terminate.
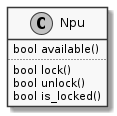
-
class Npu
Reserve NPU usage.
Public Functions
-
bool available() const
- Returns:
true if NPU successfully initialized.
-
bool lock()
Lock exclusive right to perform inference for the current process.
All other processes attemping to execute inference will fail, including those using NNAPI. The lock will stay active until unlock() is called or the Npu object is deleted.
- Returns:
true if NPU successfully locked, false if NPU unavailable or locked by another process. Calling this method on an Npu object that is already locked has no effect, just returns true
-
bool available() const
备注
The Npu class uses the RAII technique, this means that when an object of this class is
destroyed and it was locking the NPU, the NPU is automatically unlocked. This helps ensure
that when a program terminates the NPU is in all cases unlocked.
示例用法
The following diagrams show some example use of the NPU locking API.
预处理和后处理
When using neural networks the input and output data are rarely used in their raw format. Most often data conversion has to be performed on the input data in order make them match the format expected by the network, this step is called preprocessing.
Example of preprocessing in the case of an image are:
scale and/or crop the input image the the size expected by the network
convert planar to interleaved or vice-versa
convert RGB to BGR or vicerversa
apply mean and scale normalization
These operations can be performed using the NPU at inference time by enabling preprocessing when the model is converted using the SyNAP Toolkit, or they can be performed in SW when the data is assigned to the Network.
Similarly the inference results contained in the network output tensor(s) normally require further processing to make the result usable. This step is called postprocessing. In some cases postprocessing can be a non-trivial step both in complexity and computation time.
Example of post-processing are:
convert quantized data to floating point representation
analyze the network output to extract the most significant elements
combine the data from multiple output tensor to obtain a meaningful result
The classes in this section are not part of the SyNAP API, they are intented mainly as utility classes that can help writing SyNAP applications by combining the three usual steps of preprocess-inference-postprocess just explained.
Full source code is provided, so they can be used as a reference implementation for the user to extend.
InputData Class
The main role of the InputData class is to wrap the actual input data and complement it with additional
information to specify what the data represents and how it is organized.
The current implementation is mainly focused on image data.
InputData functionality includes:
reading raw files (binary)
reading and parsing images (jpeg or png) from file or memory
getting image attributes, e.g. dimensions and layout.
The input filename is specified directly in the constructor and can’t be changed. In alternative to a filename it is also possible to specify a memory address in case the content is already available in memory.
备注
No data conversion is performed, even for jpeg or png images the data is kept in its original form.

Example:
Network net;
net.load_model("model.synap");
InputData image("sample_rgb_image.dat");
net.inputs[0].assign(image.data(), image.size());
net.predict();
custom_process_result(net.outputs[0]);
Preprocessor Class
This class takes in input an InputData object and assigns its content to the input Tensor(s)
of a network by performing all the necessary conversions.
The conversion(s) required are determined automatically by reading the attributes of the tensor itself.
Supported conversions include:
image decoding (jpeg, png or nv21 to rgb)
layout conversion: nchw to nhwc or vice-versa
format conversion: rgb to bgr or grayscale
image cropping (if preprocessing with cropping enabled in the compiled model)
image rescaling to fit the tensor dimensions
The conversion (if needed) is performed when an InputData object is assigned to a Tensor.
Cropping is only performed if enabled in the compiled model and the multi-tensor assign API is used:
Preprocessor::assign(Tensors& ts, const InputData& data).
Rescaling by default preserves the aspect ratio of the input image.
If the destination tensor is taller than the rescaled input image, gray bands are added at the top
and bottom.
If the destination tensor is wider than then the rescaled input image, gray bands are added at the
left and right. It is possible to configure the gray level of the fill using the fill_color=N option
in the format string of the input tensor, where N is an integer between 0 (black) and 255 (white).
The preservation of the aspect-ratio can be disabled by specifying the keep_proportions=0 option
in the format string of the input tensor. In this case the input image is simply resized to match
the size of the tensor.
备注
The Preprocessor class performs preprocessing using the CPU. If the conversion to be done
is known in advance it may be convenient to perform it using the NPU by adding
a preprocessing layer when the network is converted, see 预处理
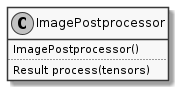
ImagePostprocessor Class
ImagePostprocessor functionality includes:
reading the content of a set of Tensors
converting the raw content of the Tensors to a standard representation (currently only
nv21is supported) The format of the raw content is determined automatically by reading the attributes of the tensors themselves. For example in some super-resolution network, the different component of the output image (y, uv) are provided in separate outputs. The converted data is made available in a standard vector.
Example:
Preprocessor preprocessor
Network net;
ImagePostprocessor postprocessor;

net.load_model("model.synap");
InputData image("sample_image.jpg");
preprocessor.assign(net.inputs[0], image);
net.predict();
// Convert to nv21
ImagePostprocessor::Result out_image = postprocessor.process(net.outputs);
binary_file_write("out_file.nv21", out_image.data.data(), out_image.data.size());
Classifier Class
The Classifier class is a postprocessor for the common use case of image
classification networks.
There are just two things that can be done with a classifier:
initialize it
process network outputs: this will return a list of possible classifications sorted in order of decreasing confidence, each containing the following information:
class_index
confidence

-
class Classifier
Classification post-processor for Network output tensors.
Determine the top-N classifications of an image.
Public Functions
-
inline Classifier(size_t top_count = 1)
Constructor.
- Parameters:
top_count – number of most probable classifications to return
-
inline Classifier(size_t top_count = 1)
Example:
Preprocessor preprocessor
Network net;
Classifier classifier(5);
net.load_model("model.synap");
InputData image("sample_image.jpg");
preprocessor.assign(net.inputs[0], image);
net.predict();
Classifier::Result top5 = classifier.process(net.outputs);
The standard content of the output tensor of a classification network is a list of probabilities, one for each class on which the model has been trained (possibly including an initial element to indicate a “background” or “unrecognized” class). In some cases the final SoftMax layer of the model is cut away to improve inference time: in this case the output values can’t be interpreted as probabilities anymore but since SoftMax is monotonic this doesn’t change the result of the classification. The postprocessing can be parametrized using the format field of the corresponding output in the conversion metafile (see 转换图元文件):
Format Type |
Out# |
Shape |
Description |
|---|---|---|---|
confidence_array |
0 |
NxC |
List of probabilities, one per class |
Attribute |
Default |
Description |
|---|---|---|
class_index_base |
0 |
Class index corresponding to the first element of the output vector |
Where:
N: Number of samples, must be 1
C: number of recognized classes
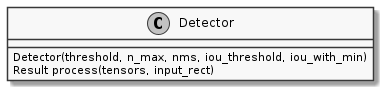
Detector Class
The Detector class is a postprocessor for the common use case of object detection networks.
Here object is a generic term that can refer to actual objects or people or anything used to
train the network.
There are just two things that can be done with a detector:
initialize it
run a detection: this will return a list of detection items, each containing the following information:
class_index
confidence
bounding box
landmarks (optional)
-
class Detector
Object-detector.
The output format of object-detection networks is not always the same but depends on the network architecture used. The format type must be specified in the format field of the output tensor in the network metafile when the network is compiled. This following formats are currently supported: “retinanet_boxes”, “tflite_detection_boxes”, “yolov5”
Public Functions
-
Detector(float score_threshold = 0.5, int n_max = 0, bool nms = true, float iou_threshold = .5, bool iou_with_min = false)
Constructor.
- Parameters:
score_threshold – detections below this score are discarded
n_max – max number of detections (0: all)
nms – if true apply non-max-suppression to remove duplicate detections
iou_threshold – intersection-over-union threshold (used if nms is true)
iou_with_min – use min area instead of union to compute intersection-over-union
-
class Impl
Subclassed by DetectorBoxesScores, DetectorTfliteODPostprocessOut, DetectorYoloBase, DetectorYolov5Pyramid
-
struct Result
Object-detector result.
Public Members
-
bool success = {}
True if detection successful, false if detection failed.
-
struct Item
Detection item.
Public Members
-
int32_t class_index
Index of the object class.
-
float confidence
Confidence of the detection in the range [0, 1].
-
Rect bounding_box
Top,left corner plus horizontal and vertical size (in pixels)
-
std::vector<Landmark> landmarks
One entry for each landmark.
Empty if no landmark available.
-
int32_t class_index
-
bool success = {}
-
Detector(float score_threshold = 0.5, int n_max = 0, bool nms = true, float iou_threshold = .5, bool iou_with_min = false)
Example:
Preprocessor preprocessor
Network net;
Detector detector;
net.load_model("model.synap");
InputData image("sample_image.jpg");
Rect image_rect;
preprocessor.assign(net.inputs[0], image, &image_rect);
net.predict();
Detector::Result objects = detector.process(net.outputs, image_rect);
The rectangle argument passed to the process() method is needed so that is can compute
bounding boxes and landmarks in coordinates relative to the original image, even if the image
has been resized and/or cropped during the assignment to the network input tensor.
Postprocessing consist of the following steps:
for each possible position in the input grid compute the score of the highest class there
if this score is too low nothing is detected at that position
if above the detection threshold then there is something there, so compute the actual bounding box of the object by combining information about the anchors location, the regressed deltas from the network and the actual size of the input image
once all the detections have been computed, filter them using Non-Min-Suppression algorithm to discard spurious overlapping detections and keep only the one with highest score at each position. The NMS filter applies only for bounding boxes which have an overlap above a minimum threshold. The overlap itself is computed using the IntersectionOverUnion formula (ref: https://medium.com/analytics-vidhya/iou-intersection-over-union-705a39e7acef). In order to provide more filtering for boxes of different sizes, the “intersection” area is sometimes replaced by the “minimum” area in the computation. SyNAP Detector implements both formula.
The content of the output tensor(s) from an object detection network is not standardized.
Several formats exist for the major families of detection networks, with variants inside each family.
The information contained is basically always the same, what changes is the way they are organized.
The Detector class currently supports the following output formats:
retinanet_boxes
tflite_detection_input
tflite_detection
yolov5
yolov8
The desired label from the above list has to be put in the “format” field of the first output tensor of the
network in the conversion metafile (see 转换图元文件) so the Detector knows how to interpret the output.
retinanet_boxes is the output format used by Synaptics sample detection networks
(mobilenet224_full80 for COCO detection and mobilenet224_full1 for people detection).
tflite_detection_input is the format of the input tensors of the TFLite_Detection_PostProcess
layer, used for example in the ssd_mobilenet_v1_1_default_1.tflite object-detection model:
https://tfhub.dev/tensorflow/lite-model/ssd_mobilenet_v1/1/default/1
This format is used when the TFLite_Detection_PostProcess layer is removed from the network at
conversion time and the corresponding postprocessing algorithm is performed in software.
In both cases above the model has two output tensors: the first one is a regression tensor, and contains the bounding box deltas for the highest-score detected object in each position of the input grid. The second one is the classification tensor and for each class contains the score of that class, that is the confidence that this class is contained in the corresponding position of the input grid.
tflite_detection is the format of the output tensors of the TFLite_Detection_PostProcess
layer, used for example in the ssd_mobilenet_v1_1_default_1.tflite object-detection model.
yolov5 is the output format used by models derived from the well-kown yolov5 arcitecture.
In this case the model has a single output 3D tensor organized as a list of detections, where each
detection contains the following fields:
bounding box deltas (x, y, w, h)
overall confidence for this detection
landmarks deltas (x, y) if supported by the model
confidence vector, one entry per class
yolov8 is the output format used by models derived from the yolov8 arcitecture, the most recent
update to the yolo family. The organization of the output tensor is very similar to that for
yolov5 here above, the only difference is that the overall confidence field is missing.
In some cases the final layers in the model can be executed more efficiently in the CPU, so they are cut away when the model is generated or compiled with the SyNAP Toolkit. In this case the network will have one output tensor for each item of the image pyramid (normally 3) and each output will be a 4D or 5D tensor, whose layout depends on where exacly the model has been cut.
SyNAP Detector is able to automatically deduce the layout used, it just requires an indication if the information in the tensor are transposed.
Format Type |
Out# |
Shape |
Description |
Notes |
|---|---|---|---|---|
retinanet_boxes |
0 |
Nx4 |
bounding box deltas |
|
1 |
NxC |
Per-class probability |
||
tflite_detection_input tflite_detection_boxes |
0 |
Nx4 |
bounding box deltas |
|
1 |
NxC |
Per-class probability |
||
tflite_detection |
0 |
NxMx4 |
Bounding boxes |
|
1 |
NxM |
Index of detected class |
||
2 |
NxM |
Score of detected class |
||
3 |
1 |
Actual number of detections |
||
yolov5 |
0..P-1 |
NxTxD |
Processing done in the model |
|
NxHxWxAxD |
One 5D tensor per pyramid element |
|||
NxHxWx(A*D) |
One 4D tensor per pyramid element |
|||
NxAxHxWxD |
One 5D tensor per pyramid element |
|||
NxAxDxHxW |
One 5D tensor per pyramid element |
Requires “ |
||
Nx(A*D)xHxW |
One 4D tensor per pyramid element |
Requires “ |
||
yolov8 |
0 |
NxTxD |
Processing done in the model |
Overall confidence missing |
Where:
N: number of samples, must be 1
C: number of classes detected
T: total number of detections
M: maximum number of detections
D: detection size (includes: bounding box deltas xywh, confidence, landmarks, per-class confidences)
A: number of anchors
H: heigth of the image in the pyramid
W: width of the image in the pyramid
P: number of images in the pyramid
Attributes for retinanet_boxes and tflite_detection_input formats:
Attribute |
Default |
Description |
|---|---|---|
class_index_base |
0 |
Class index corresponding to the first element of the output vector |
transposed |
0 |
Must be 1 if the output tensor uses the transposed format |
anchors |
Anchor points |
|
x_scale |
10 |
See |
y_scale |
10 |
See |
h_scale |
5 |
See |
w_scale |
5 |
See |
In this case, the anchor points can be defined using the build-in
variable ${ANCHORS}:
anchors=${ANCHORS}
This variable is replaced at conversion time with the content of the anchor tensor
from the TFLite_Detection_PostProcess layer (if present in the model).
Attributes for tflite_detection format:
Attribute |
Default |
Description |
|---|---|---|
class_index_base |
0 |
Class index corresponding to the first element of the output vector |
h_scale |
0 |
Vertical scale of the detected boxes (normally the H of the input tensor) |
w_scale |
0 |
Horizontal scale of the detected boxes (normally the W of the input tensor) |
Attributes for yolov5 and yolov8 formats:
Attribute |
Default |
Description |
|---|---|---|
class_index_base |
0 |
Class index corresponding to the first element of the output vector |
transposed |
0 |
Must be 1 if the output tensor uses the transposed format |
landmarks |
0 |
Number of landmark points |
anchors |
Anchor points. Not needed if processing done in the model |
|
h_scale |
0 |
Vertical scale of the detected boxes |
(normally the H of the input tensor when processing is done in the model) |
||
w_scale |
0 |
Horizontal scale of the detected boxes |
(normally the W of the input tensor when processing is done in the model) |
||
bb_normalized |
0 |
Must be 1 if the bounding box deltas are normalized (only for yolov8`) |
Indicates that bounding boxes are normalized to the range [0, 1] |
||
while landmarks are in the range h_scale, wscale |
For yolov5 format, the anchors attribute must contain one entry for each pyramid element
from P0, where each entry is a list of the x,y anchor deltas.
For example for yolov5s-face, the anchors are defined in https://github.com/deepcam-cn/yolov5-face/blob/master/models/yolov5s.yaml :
- [4,5,  8,10,  13,16]  # P3/8
- [23,29,  43,55,  73,105]  # P4/16
- [146,217,  231,300,  335,433]  # P5/32
The corresponding outputs in the metafile can be defined as follows:
outputs:
  - format: yolov5 landmarks=5 anchors=[[],[],[],[4,5,8,10,13,16],[23,29,43,55,73,105],[146,217,231,300,335,433]]
    dequantize: true
  - dequantize: true
  - dequantize: true
构建示例代码
The source code of the sample applications (e.g. synap_cli, synap_cli_ic, etc) is included
in the SyNAP release, together with that of the SyNAP libraries. Users based on the ASTRA distribution
can build SyNAP using the provided Yocto recipe.
For other users building SyNAP code requires the following components installed:
VSSDK tree
cmake
Build steps:
cd synap/src
mkdir build
cd build
cmake -DVSSDK_DIR=/path/to/vssdk-directory -DCMAKE_INSTALL_PREFIX=install ..
make install
The above steps will create the binaries for the sample applications in
synap/src/build/install/bin. The binaries can then be pushed to the board
using adb:
cd synap/src/build/install/bin
adb push synap_cli_ic /vendor/bin
Users are free to change the source code provided to adapt it to their specific requirements.